Report Parameters
Report parameters provide the way for your user to input valid values to the report prior to retrieving the results. The DAS Report Parameter system supports the following input scenarios:
- Enter a filter value (single value, lists of values, range, etc.)
- Single value only entry
- Selection by automatic valid values
- Selection by customized list of valid values
- Select by a calendar for dates
- Allow or disallow blank entry
- Selection by data type: string, date, number etc.
Report Parameter Creation
Method 1: Drag a column to the report parameter space
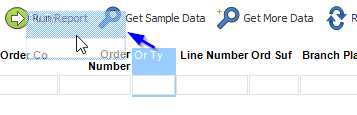
In the example above, we drag the Or Ty column above the grid columns and drop for this result:
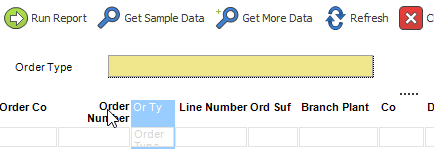
Now we have an Order Type parameter above the grid columns that is linked to the Or Ty column. In this case, any value the user enters in the "Order Type" parameter will be reflected in the Or Ty column filter. You can see that this link is present by clicking the Or Ty filter box (QBE). You will see the text <Order Type>. Angle brackets wrap the name of the parameter and is how the parameter is referenced in places like grid column filters or calculation inputs. If you try to clear the Or Ty column filter, DAS will issue a warning that says you're about to break the link between the filter and the parameter -- the default recommended course is to maintain the link.
Another feature of the Order Type parameter is that it has the same visual assist as the Grid Column Or Ty. This means that when the user clicks the Order Type entry box, DAS will present a visual assist button that shows the valid Order Type values when clicked.
Remarks on Parameter Dragging
- When a parameter is added to a report, an Empty Space Item is also created and placed automatically on the right. This allows designers to enter Arrange mode and adjust the parameter's width more easily. Review Report Parameter Arrangement to understand how to arrange the parameter panel.
- If a user drags a column into the panel quickly, the created parameter will be placed at the bottom of the existing parameter panel. If a user drags a column and drops it in between or to the right or left of existing parameters, it can be placed directly into a desired location instead (such as between two existing parameters).
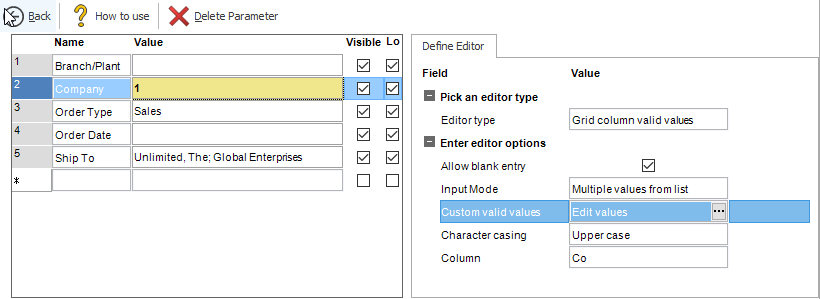
Method 2: Manually add a parameter using the parameter editor
To manually add/edit/delete the report parameter fields in your report, click Design > Parameters or the 'Design' button on the parameter panel. Once clicked, DAS will open the Report Parameter Designer as follows:
| To | Do this |
|---|---|
| Add a parameter manually | Click an empty cell beneath the Name column. Enter the name for your parameter. Tab out of the Name column. Select an editor type that is appropriate for your parameter. If you have a Date parameter, select a Date editor, etc. For each editor type you select, modify the properties of the editor to best match your parameter's needs. |
| Delete a parameter | Highlight one or more parameters. Click  Delete Row. Delete Row. |
| Make a parameter visible/invisible | Check Visible (default) to make the parameter visible. Uncheck Visible to hide the parameter from the user. |
| Lock a parameter | Check Lock to ensure the parameter isn't removed if a Quick Form Index is selected. By default, any parameters created from an index do not have the Lock option checked and any parameter created manually or by dragging up a column from the grid will have the Lock option checked. |
| Rename a parameter | Click on the parameter name in the Name column. Type in the new name. DAS will automatically update all parameter name references in your report to the new name. |
| Close the Designer and return to your report | Click OK to save your changes or Cancel to discard your changes. |
Method 3: Utilize Indexes from the Quick Form Dropdown Menu
In addition to the two methods for including parameters listed above, users can also utilize Index values for their parameters by selecting options from the Quick Form dropdown that shows up in the top right corner of DAS when reports are open.
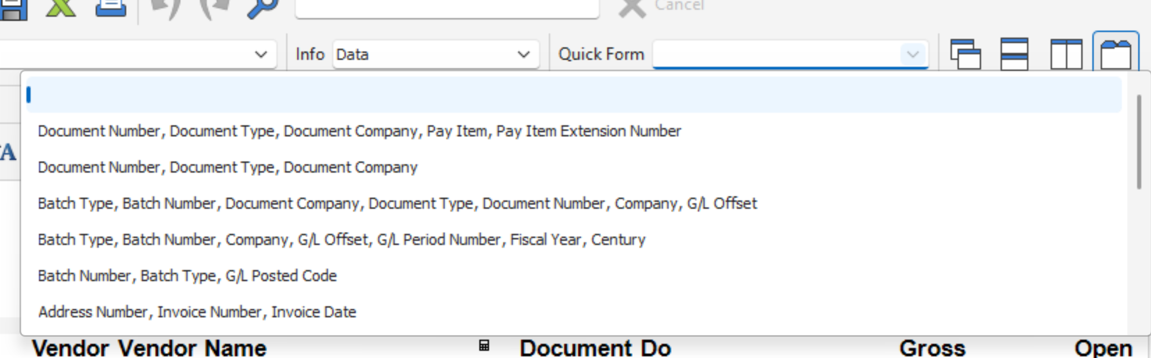
Selecting an option from this list will pull each field value in as a parameter in the opened report.
These indexes are set up in your JD Edwards database either by default or additional entry as a mechanism to easily identify what filtered fields will result in a faster data return.
Remarks on Indexes as Parameters
- Indexes selected will default to having the Lock option unchecked. This is to ensure that if a user wants to quickly switch their parameters from one list of index values to another, it replaces existing parameters rather than adding to them.
- There is an administrator setting to require index filtering called Index Use to ensure users aren't running reports without first filtering down results by a certain percentage for performance.
- If the report is a DASVIEW that joins multiple tables together, index values will only appear if all field values are pulled into the report from the Table Join wizard.
Report Parameter Arrangement
Once parameters have been created, there are a series of options to help arrange the parameters on the parameter panel to best fit the needs of any report.
Parameter Panel Positioning
When a parameter panel is created, a user has the ability to dock or position the panel to any side of the report as well as to pin or unpin the panel from view.
| To | Do This |
|---|---|
| Hide the parameter panel unless it's highlighted over | Select the Pin icon in the top right corner of the panel. The parameter will then hide itself unless a user scrolls over the Parameters header. Select Pin again to re-pin the panel to its location. 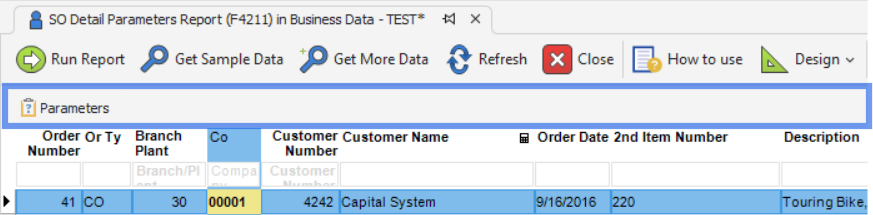 |
| Move the parameter panel to any side of your report | Click anywhere in the header of the panel and drag to drop it in a different location using the arrows that appear. If the panel is floating, it will go back to its previously saved position upon a close and reopen of the report. 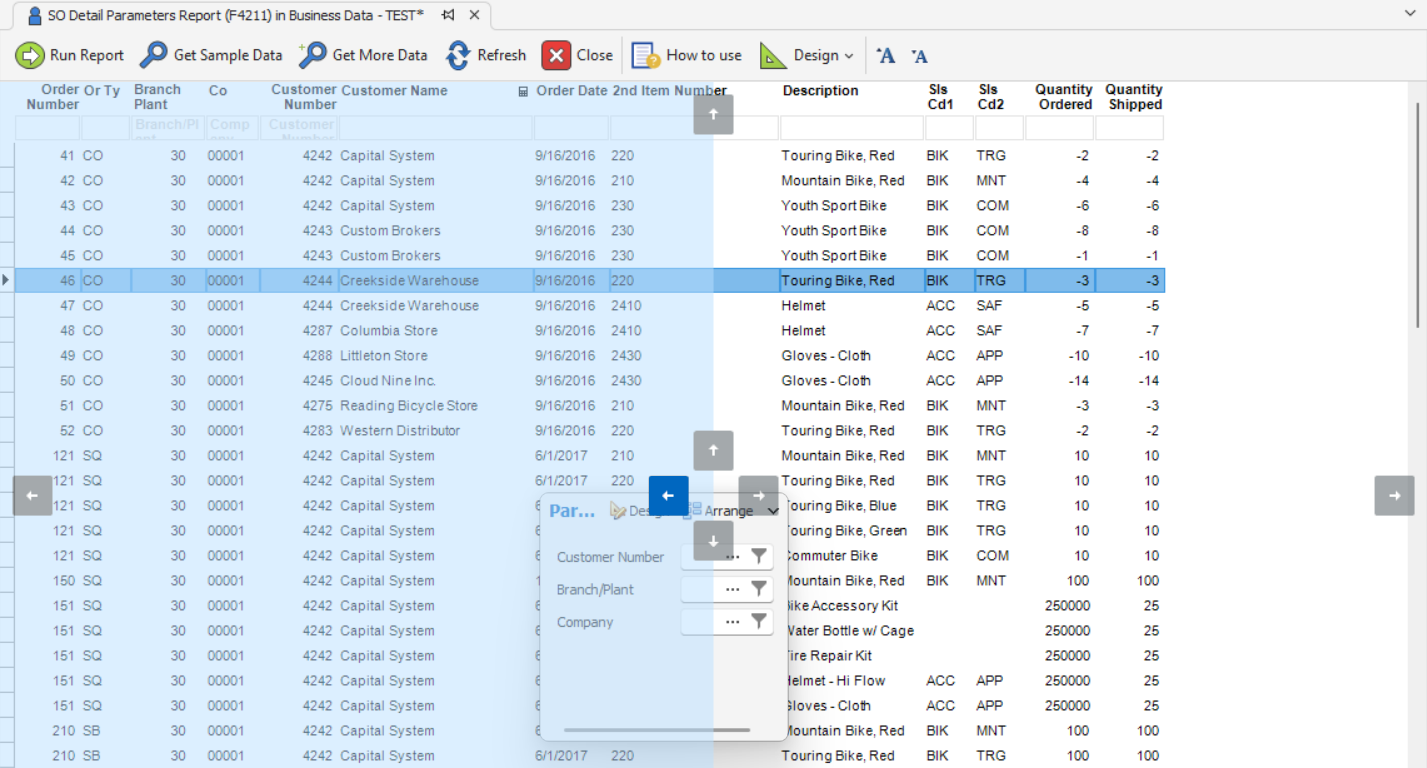 |
Note
The location and pin state of the parameter panel will save with the report.
Parameter Arrangement
When a parameter panel is created, there are a couple options seen in the top right to help designers control the placement and design of those parameters.

Design
Mentioned in Method 2 above, Design is available either from the Design > Parameters menu or by selecting Design from the panel itself.
Arrange
Selecting Arrange in the parameter panel will enter Arrange Mode. This mode makes it easy for designers to rearrange parameters, align parameters horizontally, add groups or tabs and more.
To leave arrange mode, either select Arrange again or click anywhere outside of the parameter panel.
Review Items Available to Arrange
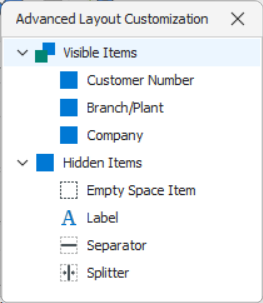
An item in the parameter panel is an element that can be used to display and organize parameter elements. While parameters can be added by dragging or going into Design, parameter-based items are added by right clicking while in the Arrange mode or in Advanced Arrange. Review the full list of available items below.
| Item | Function |
|---|---|
| Empty Space Item | Helps create space, increase or decrease width of a parameter. Included in the parameter panel by default to easily control width of any included parameters. |
| Label | Adds a label item where text can be entered. Right click and choose Rename to enter text. This option can text wrap if its height allows. |
| Separator | Adds a horizontal or vertical line. |
| Splitter | Adds a small splitter item to create space between items. This item can be used to adjust spacing horizontally or vertically outside of arrange mode as well. |
| Group | Selecting Group will place all currently highlighted items within a group. Right click on a group header to see additional options like Rename, Group Style, and Ungroup. 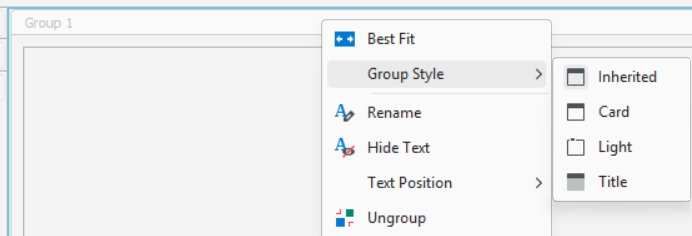 |
| Create Tabbed Group | Selecting Create Tabbed Group will place all currently highlighted items within a tab. Right click to the right of a tab to add additional tabs or remove the group. 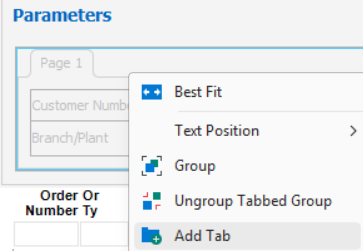 |
Note
Deleting a Group or Tabbed Group will result in everything inside of the group being deleted as well. Select Undo if you did not mean to do this. Choose Ungroup instead to remove a group without deleting the items inside of a group.
Navigating the Arrange Mode
When in arrange mode, any item that is dragged will display a blue highlight as it moves. Be aware of the blue highlight's placement as this will indicate where a item is dropped.
Example
Starting position of the parameters

Drag Company from the right, down below Customer Number only

See new arrangement of parameters

Arrange Mode Right Click Menu Options
In addition to being able to select items outlined above, when in arrange mode, the right click menu has a few additional options.
| Option | Definition |
|---|---|
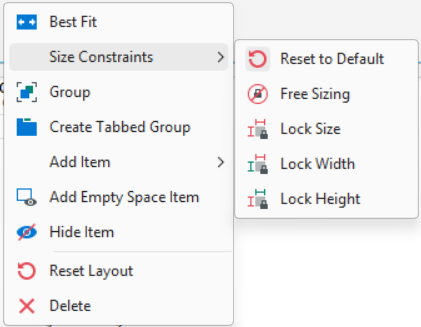
| Best Fit | Attempts to evenly distribute the items within the panel. |
| Size Constraints | A series of options to allow different aspects of items to be locked or freed from allowed default size adjustments. |
| Reset to Default | Removes any size constraint options selected and resets an item to its default behavior. |
| Free Sizing | Removes any default size constraint lock on an item. For example, without Free Sizing selected on a parameter, a user cannot expand its height manually. |
| Lock Size | Lock an item's height and width. |
| Lock Width | Lock an item's width only. This option may be particularly helpful if a parameter will require a large input string. |
| Lock Height | Lock an item's height only. If there is no other control below, even with locked height, the item will extend the entire height of the parameter panel. |
| Text Options | When right clicking on a parameter in arrange mode, there are also four Text Options available. 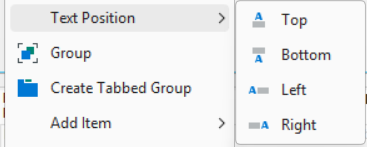 Selecting a text position will move the title of a parameter relative to the parameter's edit control. |
| Reset Layout | Removes all non-parameter items and places the parameters in a single column on the left-hand side of the panel. An Empty Space Item will be added to the right-hand side of the panel to allow a designer to easily adjust the width of the parameters. |
Advanced Arrange
In addition to arranging parameters in arrange mode, there is also an Advanced Arrange popup menu available by selecting the dropdown by Arrange and choosing Advanced.
This more structured view of the parameter panel is recommended when the report has many parameters grouped in subgroups and/or tab pages. Designers can navigate and adjust their parameter panel items through this advanced menu instead of dragging the items around directly.
The Hidden Items in this popup (Empty Space Item, Label, Separator, and Splitter) can be dragged up into Visible Items or dragged directly into the panel for placement.