Parameter Definitions
Once you have parameters defined, you can change the properties of those parameters in the parameter editor. Click on the parameter you want to customize and view the Define Editor tab:
| To | Do this |
|---|---|
| Specify editor type | Click the Editor Type selection box and pick the desired editor type:  When you select an editor type, the editor option settings below will update to reflect options for that editor type. To enter filter values like ><=! in the parameter input, use the editor type String. |
| Allow a parameter editor to access a report column's visual assist | Include a column from your report in the Column field. This does not automatically link this parameter to the filter on a column. |
| Allow/disallow blank entry | To allow blank entry (default), check the Allow blank entry check box. To force entry of a value, uncheck this checkbox. |
| Add a tooltip for hover help on a parameter | Select ... for Tooltip to type in a title and text that will act as a tooltip for your parameter. To see the tooltip, hover your mouse over the parameter title or input box once you exit design mode. |
Editor Type Options
The Editor Type will determine what type of data is allowed to be entered by the user and will also affect the type of visual assist available to a user. Depending on the editor type selected, the following additional options will be available.
| Editor type | Editor option | Definition |
|---|---|---|
| String, Character | Character Casing | Choose Normal for mixed case. Choose Upper case to force entry in uppercase. Choose Lower case to force entry in lower case. |
| Date | Time Support | When enabled, start and end time options are included. When disabled, time inclusion for date ranges is ignored. When hidden, time support entry is allowed, but start and end time visual assist options are not displayed. |
| String, Date | Single value only | Check Single value to enforce a single value input for the parameter. Default is unchecked. |
| Integer | Minimum | Smallest allowed integer value |
| Integer | Maximum | Largest allowed integer value |
Visual Assist Types
The visual assist type will determine what a user sees when they select the visual assist on a parameter in a report.
| Visual Assist Type | Definition |
|---|---|
| Default | Default will reference the editor type to identify what text is allowed to be entered in the parameter. Default, when paired with a Column will default to display that column's visual assist options (Address Numbers shows Address Book Master, Due Date shows Dates, Doc Type shows the UDC table, etc.). This option provides a filter button on the entry field that assists the user with the various filter options (list, not in list, range, etc.). See Example. |
| Custom value from list | Parameter designer specifies a list of valid values manually. If the valid values also have associated descriptions, then these will be shown to the users as well (although the report designer may override even this description in the list). Use this option to limit the valid choices to a user. See Example. |
| Custom description from list | Like custom value from list, but rather than selecting by value, the user is presented with the descriptions of those values only. This mode is handy to show the user a more friendly (and customizable) list of options which get resolved to the description's values automatically. See Example. |
| Report | Link to a report to use it as the visual assist for a parameter making it easy to dynamically return only the results needed or utilize cascading parameter functionality where one parameter filters the options available in the next. See Example for Standard Report Visual Assist and Cascading Parameters. |
Example: Default Parameter
Create a Company parameter linked to the Company field in a report.
- Drag up the Company column from the report to create a report parameter.
- Check the visual assist ellipses (...) to confirm that the Company visual assist appears.
- Select a Company ID and select Get Sample Data or Run Report to see the results change as this parameter is automatically linked into the filter field for Company.
- Select Design on the parameter panel to view the editor settings for the Company parameter.

Example: Custom Description from List Parameter
Suppose we wanted to allow the user to pick from two Ship To address numbers. The address number in this case is the "backer value" - it is that which we want to use to query. However, the user doesn't recognize address numbers as easily as the Ship To name. By using Custom description from list, we setup the Custom valid values as follows:
Here we enter the valid address numbers. Notice that the Description value automatically defaults to Associated Description which means DAS will automatically get the description for the number. You may override the description with any text.
Once set up, the user simply selects by description:
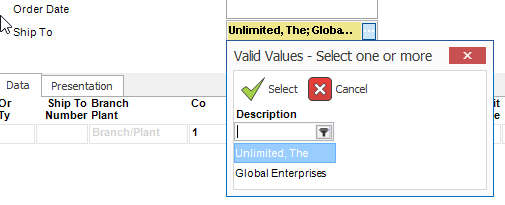
Once the user makes the selection, the Ship To token is set to the corresponding address number for that selection.
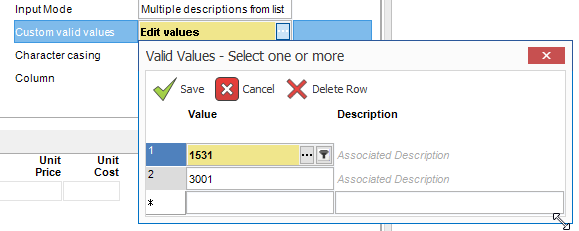
Example: Custom Value from List Parameter
Suppose we wanted to allow the user to pick from three Company numbers. In this case, the user may prefer to select by company number rather than description as it is short and recognizable to the user. By using Custom value from list, we set up the Custom valid values as follows:
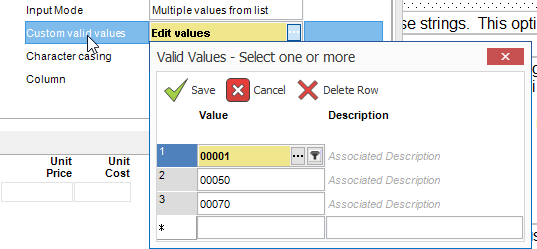
Here we simply enter each valid Company number on each line. If the column has an associated description, this will be the default description per line. You may override the description with any text.
Once setup this way, the user selects by Company number:
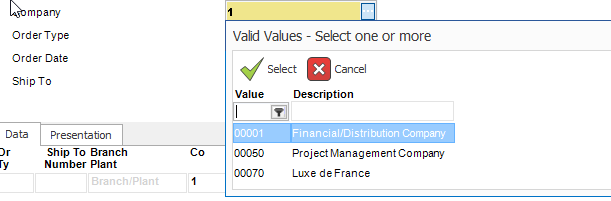
Here the user selects by number and the selection is shown as the number that's selected. The description only shows up in the Valid Values selection.
Example: Report Visual Assist Parameter
Suppose you are designing an AP Detail Report using the F0411 table with one parameter, "Vendor Number," built by dragging up the Address Number/AN8 field. As a designer, you want to ensure that your subscribers only see Vendors when they view the visual assist of the Vendor Number parameter, but, by default, it displays the full list of address numbers which includes customers, vendors, employees and more.
We can create a report visual assist for this parameter to limit these options. These instructions assume an AP Detail Report report has already been created.
Step 1: Create your report for the visual assist
- Open a new F0101 table.
- Limit the column results to just the Address Number (AN8), Alpha Name (ALPH) and Sch Typ (AT1).
- Filter Sch Typ = V (for Vendor).
- Save the report as "Vendors Visual Assist"
Step 2: Edit the parameter in design mode to use the report visual assist for Vendor Number
Return to your "AP Detail Report".
Select Design in the top right corner of the parameter panel.
While selected on your "Vendor Number" parameter, change the Visual Assist Type to Report.
Go to the Report visual assist options section and fill in the following...
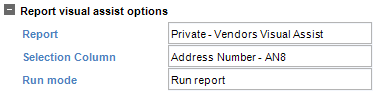
Note
The Run Mode option determines if the visual assist will Get Sample Data or Run in full. If a visual assist report may run more slowly when fully executed, the recommendation would be to utilize Get Sample Data as the Run Mode option which still allows a user to select Find and return all results once in the visual assist.
Select OK to save.
Review visual assist. See that only Vendors are being returned because of the filter on Sch Typ.
Alternatively, you could apply the Sch Typ filter for Vendor directly into the parameter editor in the Report visual assist parameter assignment section as seen below.

Example: Cascading Parameter
Suppose you're in the same AP Detail Report, but you now want to add Company and Business Unit parameters. Rather than having the default visual assist for both, you'd like the Company parameter to be required and filter the Business Unit visual assist results to only show Business Units under the selected Company filter.
We can create another report visual assist for these requirements.
Step 1: Add Co and BU parameters to your AP Detail Report
- In your existing "AP Detail Report" ensure Business Unit (MCU) and Company (Co) are visible columns in your report. If not, select Design > Columns and add them.
- Drag up both Company (CO) and Business Unit (MCU) to create two additional parameters.
- Review existing visual assists for both parameters.
Step 2: Create your report for the BU Visual Assist
- Open a new F0006 table.
- Limit the column results to just the Business Unit (MCU), Description (DL01) and Company (CO) fields.
- Save the report as "Business Unit Visual Assist".
Step 3: Edit the parameter in design to use the Report Visual Assist for Business Unit
Return to the "AP Detail Report".
Select "Design" in the top right corner of the parameter panel.
While selected on your "Business Unit" parameter, change the Visual Assist Type to "Report".
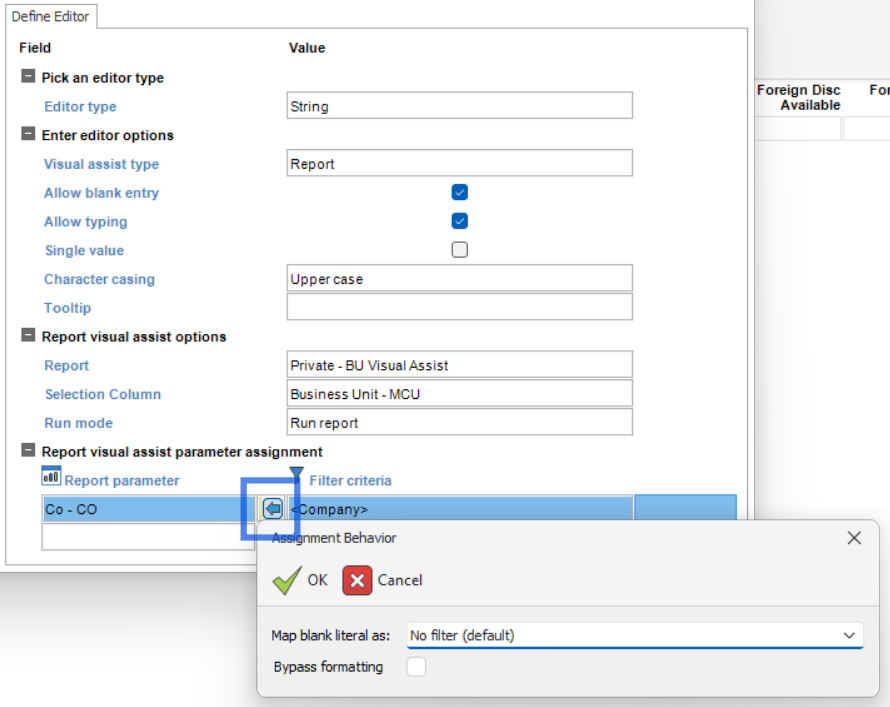
Fill in the following fields as seen in the image below: Report, Selection Column, and Report visual assist parameter assignment.
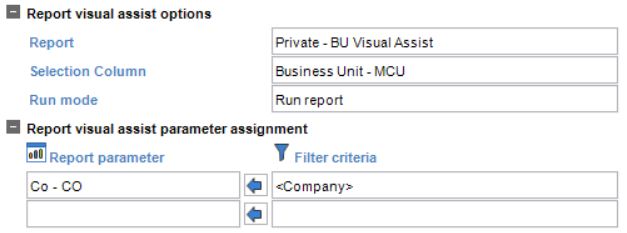
Select OK.
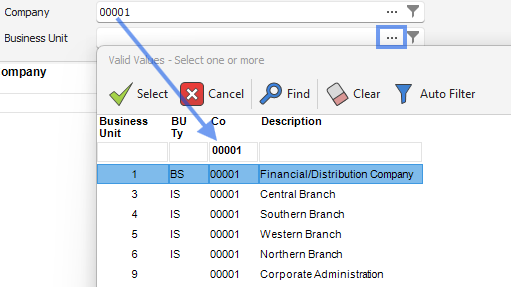
Fill in a Company and then select the ... on Business Unit in your parameter panel to see the custom visual assist you've just created.
Adjust the Company filter and select the ... on Business Unit again to see it change.
Additional Remarks for Cascading Parameters
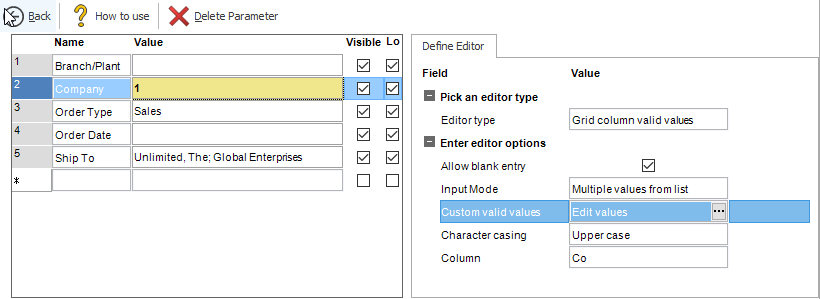
Adjusting Cascading Parent Parameters Impacts Children
Suppose that parameters are filled in on your report: Company 00001 and Business Unit 1;3;4 from that cascading parameter list. Adjusting the Company filter will result in a clearing out of the Business Unit parameter values as those are no longer valid values for that Company.
Default Assignment Behavior
By default, any cascading parameters where the parent parameter is left blank will result in the child parameter's visual assist returning all results (no filter applied). This is because the default assignment behavior is set to "No Filter".
If you would like to make it so the parent parameter being blank results in the child's visual assist filtering on <BLANK> for that link, you can adjust the assignment behavior by selecting the blue arrow on your parameter editor (see screenshot below).